


")


")


If you weren’t watching, I think I could eat this entire pie myself. I don’t really have a sweet tooth, but I’m absolutely mad for anything made with pumpkin.
This is classic pumpkin pie at its best. It’s pie you can find in the shiny, spinning dessert case at diners all across America.
For a lot of us, it’s also Grandma’s pie.
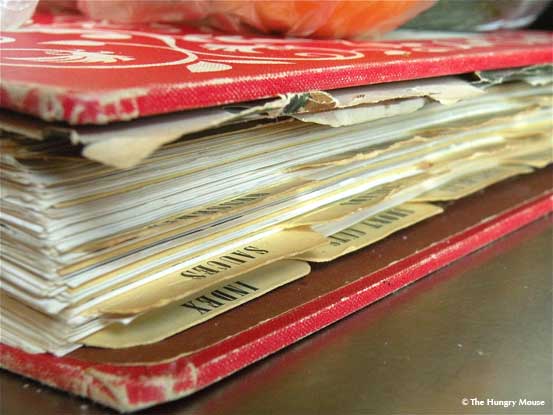
In fact, this recipe comes from my grandmother’s original 1950s Betty Crocker Picture Cookbook. Call me old fashioned, but, hands down, it’s the cookbook I reach for most often.

The cookbook is actually a binder, and is an old-style cookbook in that it covers everything, literally from soup to nuts.
(All those single-ingredient cookbooks you see these days are a relatively new phenomenon.)

This is definitely a well loved cookbook…


My cookbook is stuffed with all sorts of notes and handwritten recipes, jotted down in scrolling old-lady style on odd calendar pages and envelope backs.
Sometime, I’ll do a longer post on those treasures.


If you aren’t lucky enough to have an heirloom copy kicking around your kitchen, you can snag a reproduction on Amazon.
They started reprinting it in 1998.
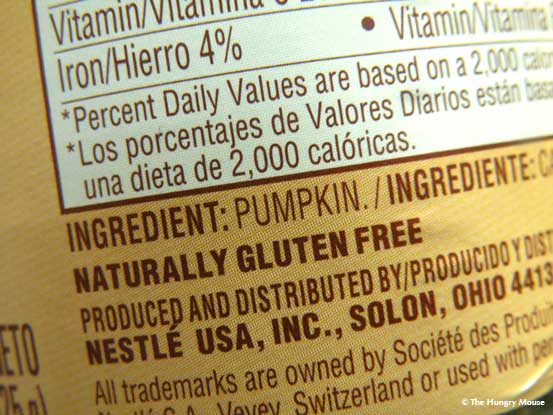
Canned Pumpkin vs. Pumpkin Pie Filling
As much as they might sound like it, canned pumpkin and pumpkin pie filling are not the same thing. Read your labels carefully. It’s easy to grab the wrong one.
Canned pumpkin is just what it sounds like: Pure, unadulterated, pureed pumpkin in a can.

Pumpkin pie filling, on the other hand, has all sorts of other stuff in it, including sugar and spices.

I always use the plain pumpkin because I like to be able to control the flavors and sweetness of my pie.
(It sounds like a small thing, until you think about adding sugar to a canned filling that’s already sweet…)

Alrighty, to the ovens!
Old Fashioned Pumpkin Pie
1 pie crust (frozen or homemade)
1 3/4 cups mashed, cooked pumpkin (that’s one 15-oz. can)
1/2 tsp. salt
1 3/4 cups milk
2 large eggs
2/3 cup dark brown sugar
2 Tbls. white sugar
1 1/4 tsp. cinnamon
1 tsp. ground ginger
1/2 tsp. ground nutmeg
1/4 tsp. ground cloves
Yields one 9-inch pie
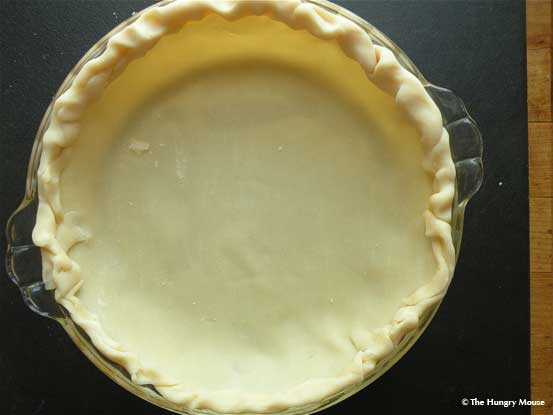
Roll out your crust
Preheat your oven to 425 degrees.
Grab your pie crust. Make it yourself (cut this crust recipe in half because you’ll only need a bottom crust), or use frozen crust in a pinch. Homemade crust is always better in my book. That said, frozen crust makes it unbelievably easy to get a freshly baked pie on the table on a weeknight. Your call.
Roll your dough out on a lightly floured board. Transfer it to your pie plate.

Fold the edges over and crimp them a little to make a nice, fluted edge.


Set your dough-lined pan aside while you make the filling.

Make the pumpkin pie filling

Measure it out and toss it into a large mixing bowl.

Add the milk and eggs to the pumpkin.


Toss in the salt, white sugar, brown sugar, cinnamon, ginger, nutmeg, and cloves.


Whisk it well to combine thoroughly.

Your goal is a uniform mixture that’s free of lumps of sugar and spice.

If raw eggs don’t bother you, give the filling a little taste. Essentially, this is what your pie is going to taste like. This is the time to toss in a little more ginger or cinnamon (etc.) if you like.


Fill the pie shell
Pour your filling into your lined pie plate.


Your filling should come up about a quarter of an inch from the top of the crust. You want a nice full pie, but you don’t want it to overflow in the oven.

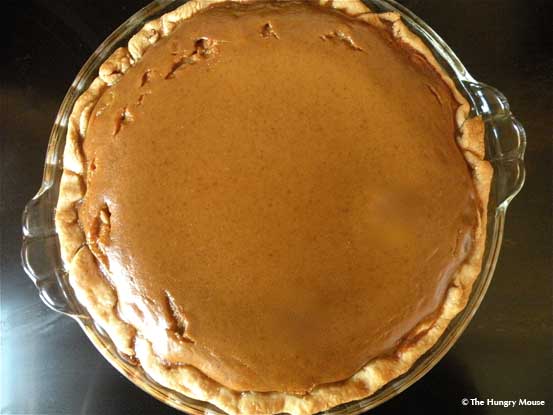
Bake the pie
Slide your pie carefully into your preheated 425-degree oven. Bake for 45-50 minutes. Keep an eye on it during the last 10 minutes of cooking.

How to test your pumpkin pie for doneness
When your pie is done, it will still be a little jiggly in the center, but the edges will be completely set.
To test this, slide a paring knife into the filling near the crust. If it comes out clean, your pie is done. If the filling sticks to the knife, it needs to bake a little longer. Slide it back into the oven for another few minutes, then test it again.

When it’s done, let your pie cool in the pan on a wire rack. Much like my cheesecakes, my pumpkin pies almost always crack around the edges. That’s just fine. If it bothers you, try putting a pan of water in the oven as the pie bakes. (Or, worst case, bust out a little whip cream to conceal it before serving.)

Allow your pie to cool completely before you dig in.
Slice and serve. Enjoy!
Calories
Fat
Carbs
Protein

The Hungry Mouse
Yields One 9-inch pie
This is classic pumpkin pie at its best. It's pie you can find in the shiny, spinning dessert case at diners all across America. For a lot of us, it's also Grandma's pie.
 Save Recipe
Ingredients
Instructions
- Preheat your oven to 425 degrees.
- Grab your pie crust. Roll your dough out on a lightly floured board. Transfer it to your pie plate.
- Fold the edges over and crimp them a little to make a nice, fluted edge. Set your dough-lined pan aside while you make the filling.
- Grab your canned pumpkin. Measure it out and toss it into a large mixing bowl.
- Add the milk and eggs to the pumpkin.
- Toss in the salt, white sugar, brown sugar, cinnamon, ginger, nutmeg, and cloves.
- Whisk the whole business thoroughly.
- Pour your filling into your lined pie plate. Your filling should come up about a quarter of an inch from the top of the crust. You want a nice full pie, but you don't want it to overflow in the oven.
- Slide your pie carefully into your preheated 425-degree oven. Bake for 45-50 minutes. Keep an eye on it during the last 10 minutes of cooking.
- How to test your pumpkin pie for doneness: When your pie is done, it will still be a little jiggly in the center, but the edges will be completely set. To test this, slide a paring knife into the filling near the crust. If it comes out clean, your pie is done. If the filling sticks to the knife, it needs to bake a little longer. Slide it back into the oven for another few minutes, then test it again.
- When it's done, let your pie cool in the pan on a wire rack. Allow your pie to cool completely before you dig in.
- Slice and serve. Enjoy!


")


