


")


")


I’ve always had an active imagination. I am that auntie who likes to tell your kids stories.
If you know me, you know what I’m talking about. And if you have kids under five, chances are that I’ve told your wee ones a tall tale or two.
For example, if your kids think that squirrels grow on trees, they probably got that from me. (Everyone knows that if you plant acorns in the fall, they’ll sprout into squirrel trees in the spring.)
And the terrible tale of the eight-legged cat? That’s one of mine, too.
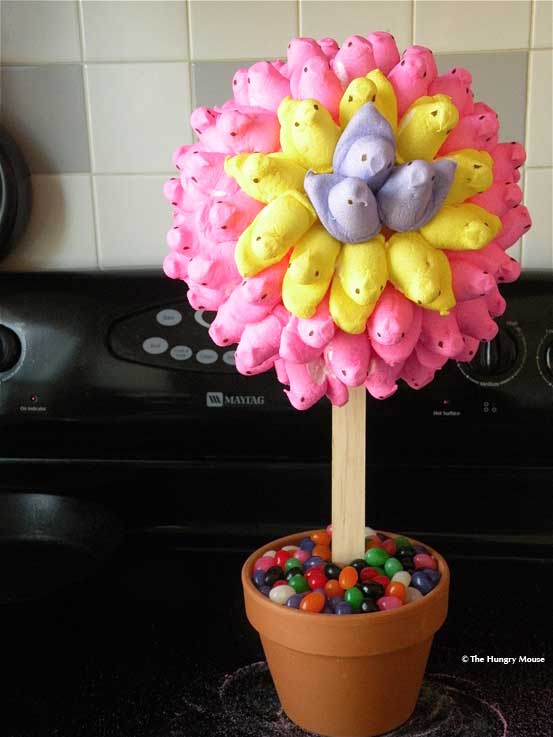
Which brings me to Peeps. Specifically, Peep trees. Much like squirrels, it’s a little known fact that Peeps grow on jelly bean trees. Topiaries, to be exact. It’s true. It must be. I have one in my kitchen right now. See?
I can’t make these things up.

If you look closely at a Peep tree, you can usually spot the leader.

If he gives you too much trouble, well, you know what to do.

Thankfully, a Peep topiary makes a fabulous (and delicious) centerpiece for your Easter table. Here’s how to make one of your very own.
It’s a fun, sticky, and totally ridiculous way to spend an afternoon. Make them with your kids. Just be careful with the toothpicks.
This table top idea is my contribution to the Kraft Breakstone’s Holiday Celebration Program. Check out a handful of other great Easter decorating ideas from the other program bloggers here.
About ingredients
Definitely switch up the candy to suit your taste. Here’s what I used.
A bag of seriously old-school jelly beans. (Think I’m kidding? Go to a drugstore and try to find regular, old-fashioned jelly beans. They’re, like, a rarity. At least around our parts.)

Boxes of Peeps, or any other festive marshmallow-y type confection. You’ll need 6 or 7 boxes. I bought a few different colors so I could make a flower-y pattern.


A styrofoam flower ball. You can find these at any big craft store.

A stake or dowel. Your Peep topiary is going to be heavier than you think by the time it’s done, so you’ll need a sturdy stick to hold it up.

A flower pot. You want it to be about the same size as your top topiary ball, so it’s stable enough to hold up the ball. So, for a 7-inch styrofoam ball, I grabbed a 6-inch pot. It worked out great. If you want to, paint the pot, cover it in glitter. Go nuts.

A box of regular old wooden toothpicks.

Here’s how I made my Peep topiary. It will give you the general idea. Improvise and change around the ingredients as you like. If you have any tips or tricks, definitely leave them in the comments. This was my inaugural Peep tree. I can only imagine that the next one will be even better.
I could see making these on the cone-shaped forms around the winter holidays with green and red, Christmas-y Peeps. (They make those, right? They must.) You get the picture.
In truth, there’s probably no limit to the marshmallow sculpture you can create.
Peep Topiary
Peep topiary
1 6-inch pot
1 7-inch styrofoam ball (for topiary top)
1 4-5 inch styrofoam chunk (for inside the pot)
1 12-inch wooden stake or thick wooden dowel
1 box of wooden toothpicks
6-7 boxes of marshmallow Peeps
1 bag of jelly beans
Other table decorations
Assorted foil covered chocolate eggs
Plastic easter eggs
Easter grass
Assorted silk flower garlands
Makes 1 Peep topiary that will knock your socks off
Assemble the topiary top
Pick your workspace carefully. It’s going to get covered in sugar.

Gather all your ingredients together on a workspace.

Poke the stake or dowel into the styrofoam ball, about into the center.


Give it a quick check to be sure you’re happy with the basic shape.

Wedge a piece of styrofoam in the bottom of the pot. You want it to be really snug, so it doesn’t move at all. This is going to anchor your topiary. I cut this piece of styrofoam from a larger piece to ensure a snug fit.

Cover the ball with Peeps
To begin, set the ball in the flower pot, so you can work on the center of the topiary.

Poke 3 toothpicks into the ball in a triangle, about an inch apart from each other. Insert them about halfway into the ball. This is the center of your topiary.


Insert 10 toothpicks in a large circle around the triangle. Make them about an inch or so apart. Don’t make yourself nuts with precise spacing. You’ll be able to adjust them later if you have gaps.


Do the outer ring first. Stick one Peep onto a toothpick. Do it so that the toothpick goes through the center of the Peep, up through his head. This will give him the strongest anchor.

Smoosh him down gently to be sure he sticks.


Repeat with the rest of the Peeps.

Next, do the center. I used the little purple guys.


Nestle them together. If you need to, remove and readjust the toothpicks so that there are no (or very few) gaps.

To do the rest of the ball, you’re basically going to place each layer of Peeps in between the Peeps on the previous layer. Like this:


Once you’ve completed each layer, start on the next.


When you’ve covered one side of the ball, it’s time to put it in the pot. Insert the stake or dowel into the center of the styrofoam in the flower pot. Stick it down far enough so that the topiary stands upright and is stable.


Work your way around the ball, alternating rows of Peeps until the entire ball is covered. I only did the flower-y face on one side of my topiary, but if you wanted to, you could do one on the other side, too. You get the idea.
A note on the very bottom of the ball. Some of your Peeps may fall off the very bottom. When the whole ball is covered, they do a nice job of sticking together and holding in place. However, if you do lose a few to gravity (I did), I think that’s just fine. When the whole thing is complete, the bottom of the ball is actually very hard to see.

When your ball is totally covered in Peeps, it’s time to finish the display.

Finish the Peep topiary
Cover the styrofoam with colored tissue paper or a few paper towels.

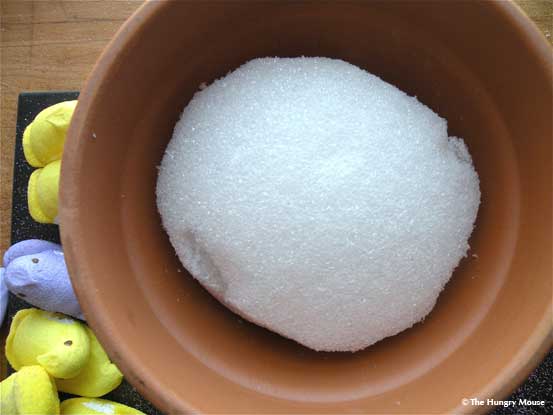
Pour in the jelly beans to cover.


And…voila! One Peep topiary! How about it?


Create your table top
Grab your Easter grass and your silk flower garlands.

Set the Peep topiary in the center of your table. Wrap the garland around in a loose circle. Fill in the area between the pot and the garland with Easter grass.


Fill a handful of plastic Easter eggs with candy and chocolate.


Nestle the filled eggs into the Easter grass.


Surround with more silk flowers, if you like. Forsythia are particularly Spring-y.

And there you have it! One Easter table top, complete with Peep topiary. (Who says the Easter isn’t fun for adults?)

Enter to win $2,500!
Don’t forget, Breakstone’s is hosting a big sweeps on Better Homes and Gardens, where one lucky winner will win $2,500! Enter today!
Please note: This is a sponsored post for Breakstone’s Sour Cream. All ideas, thoughts, experiences, photos are my own.

Have you made a Peep Topiary?
Send me your picture, and I’ll include it below! Many thanks to you all who take the time to read and write to me! <3

Peep topiary with some very mischievous looking bunnies. Photo courtesy of Lucy Paterson. (Thanks, Lucy & company!)
The Hungry Mouse
Yields 1 Peep topiary that will knock your socks off
A Peep topiary makes a fabulous (and delicious) centerpiece for your Spring table. Here's how to make one of your very own.
 Save Recipe
Ingredients
Instructions
- Assemble the topiary top: Pick your workspace carefully. It's going to get covered in sugar. Poke the stake or dowel into the styrofoam ball, about into the center. Give it a quick check to be sure you're happy with the basic shape. Wedge a piece of styrofoam in the bottom of the pot. You want it to be really snug, so it doesn't move at all. This is going to anchor your topiary. I cut this piece of styrofoam from a larger piece to ensure a snug fit.
- Cover the ball with Peeps: To begin, set the ball in the flower pot, so you can work on the center of the topiary. Poke 3 toothpicks into the ball in a triangle, about an inch apart from each other. Insert them about halfway into the ball. This is the center of your topiary. Insert 10 toothpicks in a large circle around the triangle. Make them about an inch or so apart. Don't make yourself nuts with precise spacing. You'll be able to adjust them later if you have gaps. Do the outer ring first. Stick one Peep onto a toothpick. Do it so that the toothpick goes through the center of the Peep, up through his head. This will give him the strongest anchor. Smoosh him down gently to be sure he sticks. Repeat with the rest of the Peeps. Next, do the center. I used the little purple guys. Do the rest of the ball by placing each layer of Peeps in between the Peeps on the previous layer.
- When you've covered one side of the ball, it's time to put it in the pot. Insert the stake or dowel into the center of the styrofoam in the flower pot. Stick it down far enough so that the topiary stands upright and is stable.
- Work your way around the ball, alternating rows of Peeps until the entire ball is covered. I only did the flower-y face on one side of my topiary, but if you wanted to, you could do one on the other side, too. You get the idea.
- When your ball is totally covered in Peeps, it's time to finish the display.
- Finish the Peep topiary: Cover the styrofoam with colored tissue paper or a few paper towels. Pour in the jelly beans to cover. And...voila! One Peep topiary! How about it?
- Create your table top: Grab your Easter grass and your silk flower garlands. Set the Peep topiary in the center of your table. Wrap the garland around in a loose circle. Fill in the area between the pot and the garland with Easter grass. Fill a handful of plastic Easter eggs with candy and chocolate. Nestle the filled eggs into the Easter grass. Surround with more silk flowers, if you like.


