


")


")


Want to be a superhero? Start making doughnuts at home.
It might not get you a part in the sequel to Kick Ass, but you’ll definitely earn points with your kids, your neighbors, and your dog.
Making doughnuts at home is easy. It’s fun. And they’re delicious.
Trust me.

This is my take on Cooking Light magazine’s Maple-Glazed Doughnut Hole recipe from their April 2010 issue. I picked it up specifically for the nutrition myth article. (If you haven’t read it yet, definitely take a peek. They shed good light on some old culinary taboos.)
This recipe makes very good, plain-ish doughnuts. They’re sweet and chewy and yeasty, with just a hint of maple flavor.
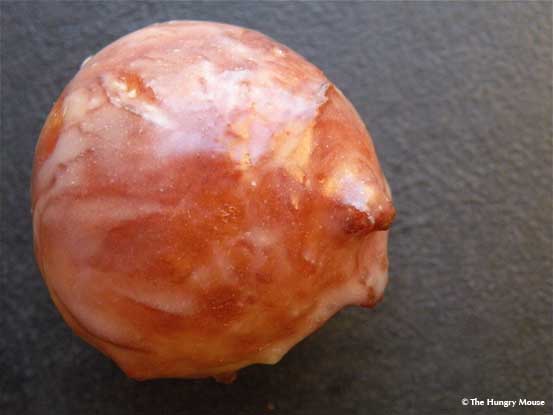
The glaze does that perfect, fresh-doughnut thing where it crackles and kind of flakes off when you bite it. You know what I mean:

Next time I make these, I’ll probably toss a little cinnamon or cardamom into the dough.
Frying ain’t so bad. (No, really: It’s not.)
That is, if you follow a few rules.
Your oil has to be at the right temp. Too hot, it’ll burn the outside of your food before the inside is done. Too cold, and a lot of oil will soak into the crust, leaving you with greasy, soggy snacks. Just right, and the oil will seal the outside of the food without really absorbing—and cook the inside perfectly.
How can you tell? Get yourself a deep-frying / candy thermometer. They’re cheap, and you can find them at almost all hardware and Target/Walmart type stores. Amazon sells them, too.

You also don’t want to crowd your pan. (Crowding lowers the temperature of your oil.) This usually means frying your food in batches, so it has plenty of room to swim around.
About sweet dough
Sweet dough is the finicky teenage sister of regular yeast dough.
All yeast doughs take a while to rise. When you start adding stuff to it—eggs, sugar, etc.—you’re weighing down the dough, so it will take even longer to rise.

Just be patient. It’s well worth the wait.
Maple-Glazed Doughnut Holes
Adapted from Cooking Light
Doughnuts
1 large egg
6 Tbls. warm water (100° to 110°)
1/4 cup sugar
1 1/8Â tsp yeast
1 1/2 cups flour
1/8 tsp. salt
3Â Tbls. sour cream
cooking spray
peanut or canola oil
Maple Glaze
1 1/2 cups powdered sugar
1/4 cup maple syrup
1/4 cup water
Makes 36 doughnut holes
Make the doughnut dough
Put the egg in a bowl. Whisk it until scrambled. Set aside for a minute.

Put the water, sugar, and yeast in the bowl of your mixer (or a large mixing bowl if you’re kneading by hand). Whisk together to break up the sugar. (It will feel really thick, like it’s too much sugar. That’s just fine.)

Pour the beaten egg into the yeast mixture.

Add the sour cream.

Whisk the whole mess together. Let it stand for about 10 minutes, until it bubbles (so you know that your yeast is alive and kicking).

Toss in the flour and the salt.

Beat for a few minutes until well combined.

The dough will be really, really sticky. That’s exactly what you want. Resist the urge to add more flour.

Spray a large bowl with cooking spray (or lightly grease it with butter). Scoop the dough into the bowl.

(Super sticky, like I said…)


Let it rise for about an hour-and-a-half
Cover the bowl loosely with lightly greased plastic wrap. Set it in a warm place for about 1 1/2 hours, or until doubled in size. (It may take more or less time, depending on the temperature of your kitchen, etc.) Be patient.

It’s still not very dramatic once it’s poofed up.

Cut and form the doughnuts
Line a sheet pan with parchment or wax paper. Set it aside.
When the dough has doubled in size, scoop it out onto a lightly floured board.


Sprinkle a little flour on the blob of dough. Knead it a few times. Form it into a rough, flat circle. Cut it into 36 squares with a large knife or bencher.


Pull off one square of dough.

Roll it into a ball. The dough will feel really soft and kind of…wimpy. That’s OK. Just you wait.

Set the dough ball on your prepared pan.

Repeat with the rest until you have a happy little army of dough balls. Arrange them so they’re not touching. (If they touch, they’ll de-poof when you pull them apart.)

Cover with a lightly greased piece of plastic wrap. Let them sit in a warm place for about 30 minutes.

Make the maple glaze
Put the powdered sugar in a medium-sized bowl. Add the maple syrup.

And the water.

Whisk together until you have a uniform paste. Set it aside while you fry the doughnuts.

Fry the doughnuts!
After about a half an hour, your dough balls will have risen a little—but not a lot.

Prep for frying
- Put about 2 to 2 1/2 inches of oil in a heavy-bottomed pot (I used a 3 quart pot).
- Clip a candy thermometer to the side of the pot. Set the heat on high. Heat the oil to about 375 degrees (a little over is fine, just don’t go under).
- Line a plate with paper towels and set it aside next to the stove.
- Line a sheet pan with paper towels or parchment paper. Set a rack on top of the paper towels. Set aside. (This is where you’ll put your doughnuts once they’ve been dipped in glaze.)
Warning: These doughnuts cook really quickly, so don’t start and walk away from the pot.
Working in batches, gently lower 3 – 6 balls of dough into the hot oil with a spider or a slotted spoon. (Be careful…oil burns are nasty.)

Stir them around constantly with your spoon or spider. You want to turn them so they cook evenly, and keep them from sticking together. They’ll poof up round and start to turn brown almost immediately.

When they’re evenly browned, fish the cooked doughnuts out of the hot oil. This should take about 1 minute, maybe less.

Transfer them to your paper towel-lined plate.

Because the oil was at the proper temperature, your doughnuts shouldn’t be at all greasy. (In fact, they should be oddly dry, almost.)

Glaze the doughnuts
Take the hot doughnuts and toss them into the glaze.

With a fork, turn the doughnuts over a few times to coat them evenly.

Set them on the rack on your prepared pan.

Repeat. Inhale.
Repeat until you’ve fried and glazed the rest of your doughnuts.


Inhale as soon as they’re cool enough to touch.


Oh, and enjoy your new superhero status.

Calories
Fat
Carbs
Protein

The Hungry Mouse
Yields About 3 dozen
This recipe makes very good, plain doughnuts. They're sweet and chewy and yeasty, with just a hint of maple flavor from the glaze.
 Save Recipe
Ingredients
Instructions
- Put the egg in a bowl. Whisk it until scrambled. Set aside for a minute.
- Put the water, sugar, and yeast in the bowl of your mixer (or a large mixing bowl if you're kneading by hand).
- Whisk together to break up the sugar.
- Pour the beaten egg into the yeast mixture.
- Add the sour cream. Whisk the whole mess together.
- Let it stand for about 10 minutes, until it bubbles (so you know that your yeast is alive and kicking).
- Toss in the flour and the salt. Beat for a few minutes until well combined.
- Spray a large bowl with cooking spray (or lightly grease it with butter). Scoop the dough into the bowl.
- Cover the bowl loosely with lightly greased plastic wrap. Set it in a warm place for about 1 1/2 hours, or until doubled in size.
- Line a sheet pan with parchment or wax paper. Set it aside.
- Cut and form the doughnuts: When the dough has doubled in size, scoop it out onto a lightly floured board. Sprinkle a little flour on the blob of dough. Knead it a few times. Form it into a rough, flat circle. Cut it into 36 squares with a large knife or bencher. Pull off one square of dough. Roll it into a ball. Set the dough ball on your prepared pan. Repeat with the rest until you have a happy little army of dough balls. Arrange them so they're not touching.
- Cover with a lightly greased piece of plastic wrap. Let them sit in a warm place for about 30 minutes.
- Make the maple glaze: Put the powdered sugar in a medium-sized bowl. Add the maple syrup and the water. Whisk together until you have a uniform paste. Set it aside while you fry the doughnuts.
- Put about 2 to 2 1/2 inches of oil in a heavy-bottomed pot (I used a 3 quart pot). Clip a candy thermometer to the side of the pot. Set the heat on high. Heat the oil to about 375 degrees.
- Line a plate with paper towels and set it aside next to the stove.
- Line a sheet pan with paper towels or parchment paper. Set a rack on top of the paper towels. Set aside. (This is where you'll put your doughnuts once they've been dipped in glaze.)
- Working in batches, gently lower 3 - 6 balls of dough into the hot oil with a spider or a slotted spoon. Stir them around constantly with your spoon or spider. You want to turn them so they cook evenly, and keep them from sticking together. They'll poof up round and start to turn brown almost immediately. When they're evenly browned, fish the cooked doughnuts out of the hot oil. This should take about 1 minute, maybe less.
- Transfer them to your paper towel-lined plate.
- Glaze the doughnuts: Take the hot doughnuts and toss them into the glaze. With a fork, turn the doughnuts over a few times to coat them evenly. Set them on the rack on your prepared pan.
- Repeat until you've fried and glazed the rest of your doughnuts. Inhale as soon as they're cool enough to touch.


")


