Soft and Chewy Rye Bread

69
23272
*This post contains Amazon affiliate links.*

‘Tis the season for leftover corned beef. One of my favorite ways to enjoy it is a nice, fat corned beef on rye, spread thickly with mustard. This rye bread is easy and oh-so-tasty to whip up at home.

There are a zillion recipes for homemade rye bread. This is how I make mine. It’s part rye flour and part regular, all-purpose flour. The mix produces a light, airy loaf with a moist crumb and soft, chewy crust. This recipe makes enough for two good-sized loaves of bread. I tend to make mine free-form, but you can certainly mold your dough into any shape you like. You’ll just have to monkey around with the baking time. For the flour, I used Hodgson Mill old-fashioned, stone-ground rye flour. Many rye bread recipes call for brown sugar or molasses. I used molasses. It gives the bread a slightly darker color and a more complex flavor, without adding any real sweetness. I used my stand mixer to knead the dough, but you can certainly make it the old-fashioned way: By hand, with a lot of elbow grease.

Soft and Chewy Rye Bread

2 cups lukewarm water 1/4 cup unsulphured molasses 1 Tbls. yeast 2 Tbls. olive oil 1 cup rye flour 1 Tbls. kosher salt 4 1/2 cups unbleached, all-purpose flour 2 Tbls. caraway seeds Yields 2 large loaves

Soft and Chewy Rye Bread: Make the dough

Put the warm water in the bowl of your stand mixer. It should be lukewarm, not hot. (If it’s too hot, it can kill your yeast…leaving you with dough that doesn’t rise.) Add the molasses to the water. Whisk to combine well. Add the yeast to the molasses water. Whisk again to combine. Let the mixture sit for about 5 minutes to give the yeast time to bloom. Wait, bloom? Yep, bloom. Don’t skip this step, unless you’re sure that your yeast is fresh. (It’d be a shame to go through the trouble and ingredients to make the bread, only to realize that your yeast is dead.) The warm water wakes the yeast up, and the sugar in the molasses gives it a little snack to get it working. After about 5 minutes, if your yeast is happy and alive, you’ll see a little raft start to form on the surface of the mixture, like this: Next, drizzle in the olive oil. Add the rye flour and the kosher salt. Whisk to combine well. Next, add the all-purpose flour. Switch from a whisk to a wooden spoon and stir to combine. Toss in the caraway seeds.

Soft and Chewy Rye Bread: Knead the dough

Once you’ve added the caraway seeds, fit the bowl onto your stand mixer. Attach the dough hook and knead on medium for about 5 minutes. The dough will come together in a sticky ball. After about 5 minutes, the dough will still be fairly sticky. That’s just fine. (Don’t add more flour…you’ll make it too dense.)

Soft and Chewy Rye Bread: The first rise

Round the dough up into a neat ball in the bottom of your mixing bowl. 
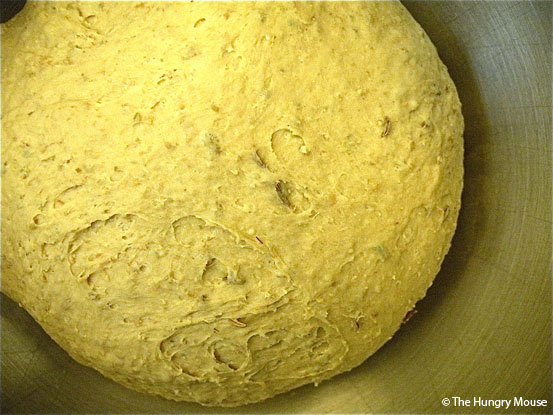
Cover the bowl with a damp cloth or a damp few paper towels. Set it in a warm place to rise for an hour, or until it’s about doubled in size.

Soft and Chewy Rye Bread: Form the loaves & let rise again

Line a sheet pan with parchment paper or a silicone baking mat. After about an hour, your dough should have about doubled in size, like this: Smoosh all the air out of it with your hands. Form it into a nice, tight ball and set it on a board. At this point, it shouldn’t really stick, but if it does, toss a little flour under it. With a bencher or sharp knife, divide the dough in half. Knead each ball a few times. Form each ball into an oblong, kind of football shape. Set the loaves a fair distance apart on your prepared pan, like this: Cover the loaves with a damp cloth or damp paper towels. Set the pan in a warm place. Let them rise again for about an hour, until they’ve about doubled in size, like this:

Soft and Chewy Rye Bread: Bake the bread

Remove the towel. If you like, cut a few shallow slashes in the top of each loaf with a very sharp knife. Cut with your knife on an angle like this. You want to be very careful not to poke the loaf too much, and deflate it. When the bread bakes, the slashes will open up and create a very nice looking loaf. Slide the pan into the oven. (Wait! A cold oven?? Yes, a cold oven.) Set the temperature to 400 degrees and bake like this for 15 minutes. After 15 minutes, lower the temp to 350 degrees. Bake at 350 for 20-25 minutes more.

Soft and Chewy Rye Bread: How can I tell when the bread is baked?

Pick up one of the loaves with a pot holder-clad hand. Flip it over, so the bottom is facing you. It should be nice and brown. With your other hand, give the middle of the bottom of the loaf a thump. It should sound hollow. If it sounds dull, it likely needs a few more minutes in the oven.

Soft and Chewy Rye Bread: Cool, serve, and enjoy!

When your bread is done, slide the loaves on to a rack to cool completely. When the bread is cool, slice and enjoy!

SHARE
Previous articleEggplant Fries
Next articleBlackened Chicken Fingers with Lime-Infused Marmalade
Jessie Cross is a cookbook author and creator of The Hungry Mouse, a monster online food blog w/500+ recipes. When she's not shopping for cheese or baking pies, Jessie works as an advertising copywriter in Boston. She lives in Salem, Massachusetts with her husband and two small, fluffy wolves.

69 COMMENTS

  1. Great tute on rye bread! This will be a bread experiment for me soon! Check out this sour cream bread from 'Beard on Bread' ... turns out pretty good each time, and is great for Grilled Cheese. http://tinyurl.com/con4z9
  2. I like that this is easy to make, not intimating for the beginner bread baker! The rye bread looks so soft on the inside and nice crust on the outside. I'm a fan of rye bread because they make great panini sandwiches
  3. That's some beautiful bread! My kitchenaid is a lifesaver when it comes to kneading; I never bothered to make bread before I had it. Rye is my favorite, I wonder why it's never crossed my mind to make it before? I'll have to go on a search for some rye flour and give it a try. I love a good challenge!
      • I buy my rye flour at Walmart and then my sister in law ships it to me in the Philippines. all the rye bread here is very heavy and hard crust. I am looking forward to trying your recipe.
    • Hehehehehe, oh too funny! :D Love rye bread. When I was a kid, one of my favorite treats would be the very tippy end piece of the deli rye my mom used to get. Smear a little butter on it, and I was a very happy little mouse. :D +Jessie
  4. I've got this recipe rising right now. I used 3/4C brown sugar + 1/4 C water for the molasses since I didn't have any, so I'll let you know how that works out. I'm glad I found this recipe, my first shot at rye bread last week made a beautiful brick. Literally. It never really rose and when I baked it, it turned into a brick. We laughed that we'd kill the birds it we put it out, plus we couldn't even cut the thing! LOL. I really think this one will do better, as it has a better rye to white flour ratio.
    • Hiya! Oh, oh! You can do it! Go to a regular old supermarket and get yourself a package of active dry yeast. Active dry yeast comes in two varieties--regular and quick rising. Depending on the brand, the "quick rising" type might have some other name that implies speediness. Either is fine. The quick rising will work a little faster. Don't get the kind labeled specifically for a bread machine. I'm not sure how that stuff works, as I always make my bread by hand. The only other really important thing to know about yeast is that water that's too hot will kill it. SO...when you add the warm water at the beginning, just make sure that it's not too, too hot. Too hot means it would be uncomfortable to wash your hands with... Then, just wait for it to bloom (see pictures above), and you should be all set! Good luck! Give me a shout with any more questions, or if I can assist at all. Cheers! +Jessie
  5. This is the best rye bread i have ever had. Better than buying in a bakery. Thanks for the recipe. If followed exact WOW!!
  6. You're absolutely right about thumping the bottom of the bread to determine if it is done. Another way is to take the temperature in the center. All bread is done at 200F. Very foolproof.
    • Hey Donnie, Alrighty, I haven't tried that with this recipe, but here's my best guess. While white whole wheat flour comes closest to approximating traditional all-purpose flour, it'll generally yield a denser, rougher loaf. Not that that's a bad thing at all. Just good to know. If you're looking to produce a more traditional rye bread, I'd try half all-purpose flour, half white wheat to start with. Let me know what proportions you try and how it turns out? Thanks! +Jessie
  7. Hi, Just tried your recipe. Delicious! One problem ... the second rise was more like a spread, and my loaves are kind of flat. I'm wondering if the dough was too wet (it was really sticky after the first rise) or wrong kind of yeast? Any suggestions? Thanks!
    • Hey Jennifer, here we are 2 years after you posted this so I don't know if this will be read but I had the same problem that you did. Have you found a solution? This is my first time making rye bread. I've only been baking bread for about three months. Thanks!!
  8. Your very talanted in the kitchen. I made my rye bread in the bread machine for years. I will try your recipe very soon. I love the taste of rye. MY question to you is: do you ever crush or powder your seeds? I have a coffee grinder I only use for herbs. I do the same for fennel seeds when i make sausages. I also see some chefs roasting them before usage. Not sure if that adds flavor or not. Your comments are appriciated.
  9. this was my second time ever making bread ( the first being a ciabatta). I have to say, the recipe was easy to follow, and turned out great. We love Rye bread, and this was a huge hit. thanks for the tutorial.....do you have others as well?
  10. I made the bread today and, though I haven't eaten it yet--I will tomorrow--it is so soft to the touch! I used only about 1/2 AP flour (+ a bit of vital wheat gluten) and other than the 1 cup of rye, the remaining flour was white whole wheat. This is my first rye bread recipe. Thanks for sharing; I can't wait to try it!
  11. hi, finally found a simple recipe for rye bread and would love to try soon. I don't have a bread machine, would using the hand to knead be okay ? How many minutes would l need to spend on kneading manually or how would i know that the kneading time is ok? thanks cheers.
  12. Making this tonight to do Patti-melts on tomorrow! I hope it comes out good, but so far, step by step, it looks just like yours. I had to knead it by hand because I don't have a fancy schmancy stand mixer anymore (killed mine, RIP stand mixer) but it looks right and smells fantastic! Would you mind if I linked your page on my blog when all is said and done?
  13. I have a list of rye bread recipes that I am slowly going through, and today it was the turn for your recipe. Major yum, one of the best rye bread recipes I have tried so far. We really like rye bread and I have a very large oven and large commercial baking sheets so I made 1 1/2 times the recipe to yield 3 loaves. I used instant yeast and just plunked all the ingredients in my Bosch universal mixer, turned it on, and kneaded for 5 minutes. I started with just a little over 4 cups flour as I live in a very dry climate and my flour is drier. That is all I needed. I found the second rising time to be about 30 minutes where I live. I put the loaves in the cold oven, baked as directed, and they turned out beautifully. I lightly basted with with an egg wash during the last 15 minutes of baking. When the bread had cooled, I sliced and buttered and tasted a piece, and I could not believe the flavor. It was exactly like the rye bread served in a restaurant my family used to frequent when I was younger. So good. Nice chewy crust, nice tender crumb inside, just an all around delicious loaf. Thx so much for a great recipe.
  14. I have a list of rye bread recipes that I am slowly going through, and today it was the turn for your recipe. Major yum, one of the best rye bread recipes I have tried so far. We really like rye bread and I have a very large oven and large commercial baking sheets so I made 1 1/2 times the recipe to yield 3 loaves. I used instant yeast and just plunked all the ingredients in my Bosch universal mixer, turned it on, and kneaded for 5 minutes. I started with just a little over 4 cups flour as I live in a very dry climate and my flour is drier. That is all I needed. I found the second rising time to be about 30 minutes where I live. I put the loaves in the cold oven, baked as directed, and they turned out beautifully. I lightly basted with with an egg wash during the last 15 minutes of baking. When the bread had cooled, I sliced and buttered and tasted a piece, and I could not believe the flavor. It was exactly like the rye bread served in a restaurant my family used to frequent when I was younger. So good. Nice chewy crust, nice tender crumb inside, just an all around delicious loaf. Thx so much for a great recipe.
  15. I really want to make Rye Bread but not sure about Unsulfured Molasses? Please tell me what bearing that would have on the recipe. In all honesty, I never heard of Unsulfured Molasses Thank you
  16. Sulfured vs Unsulfured Molasses Sulfured molasses refers to molasses that has been treated with sulfur dioxide as a preservative. Generally, only young sugarcane requires this treatment. Therefore, molasses made from mature sugarcane is often unsulfured. Unsulfured molasses may have a lighter, cleaner sugar flavor.
  17. Thank you for making such an easy recipe to follow. This is my first ever attempt to make Rye Bread. Making corn beef sandwiches tonight and using this bread. Fantastic pictures.
  18. I am going to try this right now! I love rye bread. I love the 100 percent right bread but after many failed attempts to make it I am now going to try this. You did a fabulous tutorial and I appreciate your efforts very much! I will let you know how it turns out. Cheers, Shelly
  19. I used blackstrap molasses and added 0.5 T more yeast. I used my KitchenAid mixer and kneaded for 5 minutes. As usual, the loaves came out like bricks. I simply fail every time I try to make homemade bread. The taste was good but the end product was less than satisfactory. Yeast bloomed well after adding 0.5T white sugar. I used each ingredient and followed the directions too the letter. Bricks again...no bread. Please help.
  20. I used blackstrap molasses and added 0.5 T more yeast. I used my KitchenAid mixer and kneaded for 5 minutes. As usual, the loaves came out like bricks. I simply fail every time I try to make homemade bread. The taste was good but the end product was less than satisfactory. Yeast bloomed well after adding 0.5T white sugar. I used each ingredient and followed the directions too the letter. Bricks again...no bread. Please help me bake better bread!
  21. I think this recipe needs 2T yeast since its a two loaf recipe. I did that and it made awesome rye bread. Mike this might be why your bread is dense. Try 2T yeast instead of the 1T in this recipe.
  22. Absolutely delicious !! I have made this 3 times now and everytime has turned out perfect! With rosemary ham..sliced onions ...mayonnaise and butter lettuce...gah....heavenly! Thank you so much for sharing a recipe and for such a wonderful tutorial with pictures as well! Cheers from Vancouver Island Canada :-)
  23. In searching for a rapid rise yeast - rye bread this recipe came up. I made only one loaf and although I did not have the seeds on hand it turned out great. It was a perfect recipe for my bread maker. I know I'll make it again
  24. I made this today and it didn't rise the second time. Beautiful rise in the bowl, but was a bit sticky, then it didn't rise in loaves, just spread out. What did I do wrong?
  25. Just made this, my first loaf with my KitchenAid stand mixer. The dough seemed to be too sticky, but I'm not a bread baker beyond using a bread machine. Mine, too, spread out so it's only about 2" high. Tastes really good though. One question, my husband and I had differing opinions on. The 15 minutes at 400: does the timing begin when you first put the bread in the cold oven, or once the 400 is reached? Will def try it again. As a first ever loaf of bread without a machine, it ain't bad!
  26. My sister bought me a kitchen aid mixer for Christmas, and the first thing I tried was this fabulous bread. I baked another two loaves this morning. Your directions and pictorial are very helpful. Many thanks!
  27. This is my first time of ever trying to make bread at home (at least without my bread machine). I cut the recipe in half and made only 1 loaf and reduced the baking time by 5 mins (as I am the only one that loves rye bread in the home). It just came out of the oven, I hope it tastes as good as it looks and smells! Will let you know! Thank you so much for the concise instructions and pictures.
  28. I just tried this recipe...my first time ever working with yeast or baking bread. O.M.G!!! What an awesome recipe. The tutorial was spot on and the pictures helped this novice baker. The only mistake I made was cutting the recipe in half and only making one loaf! I will probably be baking again in a couple of days (busy tomorrow) and will never buy store bought rye bread ever again. Thank you, thank you oh by the way THANK YOU! ps...can extra loaves be frozen?
  29. I should have read the recipe more closely. I didn't follow the part about starting it in a cold oven. It came out fine though. I did find it salty. Next time, I will use less salt.
  30. Just pulled it out of the oven. It looks great, but does not taste great. As I called the children down to taste my latest baking endeavor hoping to hear oohs and aahs, I heard, "This has no flavor", and "This needs salt". As one of my sons grabbed the salt shaker and sprinkled it on the bread, I thought, Salt? Did I forget to add the salt? Um...yes, I did. Great crumb and crust, ...just needs salt... Will definitely try again! Thanks for sharing.
  31. Just made my 5th and 6th loaves and a pizza with this recipe.Its very good and perfectly matched to 5280’ above sea level!
  32. This was wonderful! I made a few daring modifications because I have been trying to find a way to use rye flour with wheat flour so I used 4 cups of wheat and one cup of rye flour, and added a heaping spoonful of gluten. I also added a little bit more water because I was worried that the wheat flour plus the rye would make it too dry and dense. I don't think I needed the water though, because when I baked the loaves they took longer than they should have and they fell a little bit and were a bit sticky in the middle when it was all done. I just sliced them open from the side and baked them for another 10 minutes wide open :-) I also skipped the caraway seeds but added poppy seeds, sesame seeds, sunflower seeds and pumpkin seeds on the top. Next time I think I will make them in rolls instead of loaves and see how that goes. It was delicious with my homemade strawberry rhubarb jam or a little raw honey. Thank you for this excellent recipe!
  33. Hey there! I love this recipe. Thank you so much. One thing, is it possible to also put the recipe into recipe format? I think your tips, descriptions and photos/videos are great, but a printable recipe would be so great. Anyway, not complaining - love this! Thanks for sharing it!

LEAVE A REPLY